How to train YOLOv3 to detect custom objects
from : thisLInk
How to train YOLOv3 to detect custom objects
This tutorials is how to train cat and dog object using Yolo-v3
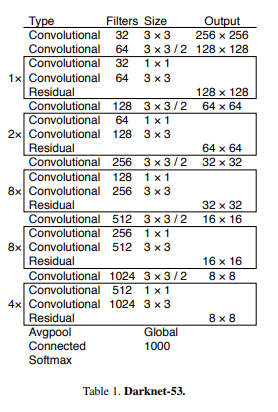
YOLO V3 Details — Feature Extractor:
We use a new network for performing feature extraction. Our new network is a hybrid approach between the network used in YOLOv2, Darknet-19, and that newfangled residual network stuff. Our network uses successive 3 × 3 and 1 × 1 convolutional layers but now has some shortcut connections as well and is significantly larger. It has 53 convolutional layers so we call it…. wait for it….. Darknet-53!. If you want to read about yolo v3 please click here.

Dataset Preparation:
The dataset preparation similar to How to train YOLOv2 to detect custom objects blog in medium and here is the link.
Please follow the above link for dataset preparation for yolo v3 and follow the link untill before the Preparing YOLOv2 configuration files .
Training:
Download Pretrained Convolutional Weights:
For training we use convolutional weights that are pre-trained on Imagenet. We use weights from the darknet53 model. You can just download the weights for the convolutional layers here (76 MB).
Preparing YOLOv3 configuration files
YOLOv3 needs certain specific files to know how and what to train. We’ll be creating these three files(.data, .names and .cfg) and also explain the yolov3.cfg and yolov3-tiny.cfg.
- cfg/cat-dog-obj.data
- cfg/cat-dog-obj.names
First let’s prepare the YOLOv3 .data and .names file. Let’s start by creating cat-dog-obj.data and filling it with this content. This basically says that we are training one class, what the train and validation set files are and what file contains the names for the categories we want to detect.
classes= 2
train  = cat-dog-train.txt
valid  = cat-dog-test.txt
names = cat-dog-obj.names
backup = backup/
The backup is where you want to store the yolo weights file.
The cat-dog-obj.names looks like this, plain and simple. Every new category should be on a new line, its line number should match the category number in the .txt label files we created earlier.
cat
dog
Now we go to create the .cfg for choose the yolo architecture. If you have less configuration of GPU(less then 2GB GPU) you can use tiny-yolo.cfg or have good configuration of GPU(Greater then 4GB GPU) use yolov3.cfg.
STEP 1: (IF YOU CHOOSE TINY-YOLO.CFG)
i) Copy the tiny-yolo.cfg and save the file name as cat-dog-tiny-yolo.cfg
manivannan@manivannan-whirldatascience:~/YoloExample/darknet-v3$ cd cfg
manivannan@manivannan-whirldatascience:~/YoloExample/darknet-v3/cfg$ cp yolov3-tiny.cfg cat-dog-yolov3-tiny.cfg
I just duplicated the yolov3-tiny.cfg file, and made the following edits:
Change the Filters and classes value
Change the Filters and classes value
- Line 3: set
batch=24, this means we will be using 24 images for every training step - Line 4: set
subdivisions=8, the batch will be divided by 8 to decrease GPU VRAM requirements. - Line 127: set
filters=(classes + 5)*3in our casefilters=21 - Line 135: set
classes=2, the number of categories we want to detect - Line 171: set
filters=(classes + 5)*3in our casefilters=21 - Line 177: set
classes=2, the number of categories we want to detect
Start the Trinaing with follow the step 1:
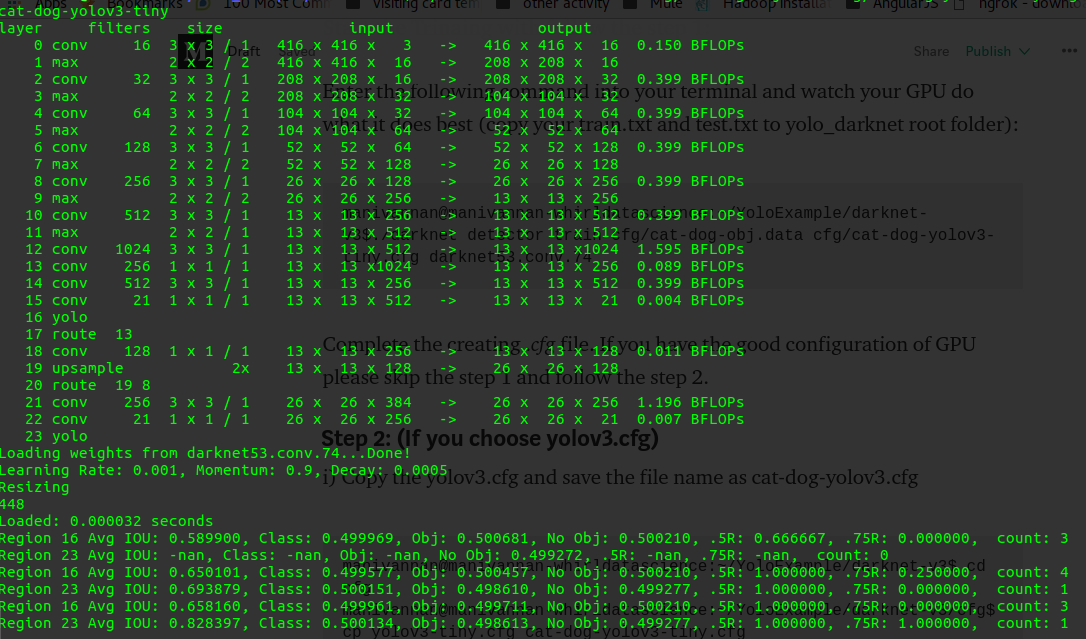
Enter the following command into your terminal and watch your GPU do what it does best (copy your train.txt and test.txt to yolo_darknet root folder):
manivannan@manivannan-whirldatascience:~/YoloExample/darknet-v3$./darknet detector train cfg/cat-dog-obj.data cfg/cat-dog-yolov3-tiny.cfg darknet53.conv.74
OUTPUT:

Complete the creating .cfg file. If you have the good configuration of GPU please skip the step 1 and follow the step 2.
STEP 2: (IF YOU CHOOSE YOLOV3.CFG)
i) Copy the yolov3.cfg and save the file name as cat-dog-yolov3.cfg
manivannan@manivannan-whirldatascience:~/YoloExample/darknet-v3$ cd cfg
manivannan@manivannan-whirldatascience:~/YoloExample/darknet-v3/cfg$ cp yolov3.cfg cat-dog-yolov3.cfg
I just duplicated the yolov3.cfg file, and made the following edits:
Change the Filters and classes value.
Change the Filters and classes value.
- Line 3: set
batch=24, this means we will be using 24 images for every training step - Line 4: set
subdivisions=8, the batch will be divided by 8 to decrease GPU VRAM requirements. - Line 603: set
filters=(classes + 5)*3in our casefilters=21 - Line 610: set
classes=2, the number of categories we want to detect - Line 689: set
filters=(classes + 5)*3in our casefilters=21 - Line 696: set
classes=2, the number of categories we want to detect - Line 776: set
filters=(classes + 5)*3in our casefilters=21 - Line 783: set
classes=2, the number of categories we want to detect
Start the Trinaing with follow the step 2:
Enter the following command into your terminal and watch your GPU do what it does best (copy your train.txt and test.txt to yolo_darknet root folder):
manivannan@manivannan-whirldatascience:~/YoloExample/darknet-v3$./darknet detector train cfg/cat-dog-obj.data cfg/cat-dog-yolov3.cfg darknet53.conv.74
Important Notes while training:
Weights only save every 100 iterations until 900, then saves every 10,000. If you want change the process please follow the link.


留言
張貼留言